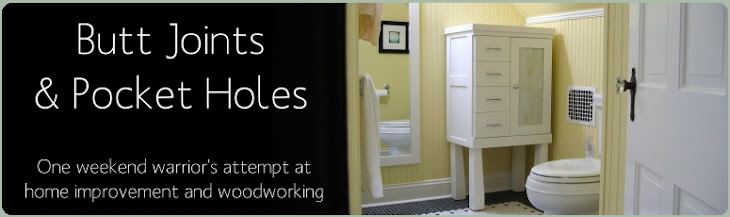
Here is a problem I predicted would happen. To prevent it, I installed the faucet onto the vanity top, mounted the vanity top on the vanity, told the plumber the plans for the finished floor height, and told her to measure off the vanity to determine where to rough in the vanity drain discharge. I warned her that the vanity had a shelf that would be below the plumbing that would have to be considered.
Even with the above precautions, she roughed in the discharge too low. So low that there was not enough room for a proper P-trap below my sink. Grrrrrrrrr.
After switching from my 1.5" plastic P-Trap to a 1.25" chrome P-trap I gained a 1/4" but it was not enough. So I had to spend all morning with a chisel and hammer, cutting out a chunk of the shelf for the low side of the P-Trap to sit in. It was a depressing task considering I had build the vanity myself.
I did my best to carve out my hole without going all the way through the shelf because I had a drawer below it. After getting as low as I could, the pipes still connected at a slight angle that caused the gasket to leak. After 2 trips to Ace Hardware and 2 trips to Lowes, I still could not find a gasket big enough to fix my leak. I ended up buying a piece of rubber and making my own gasket with scissors and a knife. So far...no leaks. But I'm keeping an eye on it.
Wednesday, June 25, 2008
P-Trap Trouble
The Lights
Installing light fixtures must be one of the most satisfying parts of any renovation. After viewing the bathroom via the harsh florecent work light for months, it is nice to see the bathroom under the actual light it will have.


Tuesday, June 17, 2008
The Toilet!
It was last December that we ripped out the old one to begin tearing out the concrete floor. This morning I used our newly installed Toto Drake 1.26 gallon E-Max flusher for the first time. It was wonderful. However, while I was using it Melissa was quick to note that I need to bring the bathroom door in to put back on its hinges.
When we rennovated our upstairs bathroom two years ago, I installed a Kohler toilet because it matched the Kohler style series we had picked out (i.e., sinks, towel bars, etc.). I remember the Kohlet toilet having poor instructions, coming with parts that were from the wrong toilet, and having manufacturing defects that caused major leaks. This time I did due diligence and picked out the Toto Drake, which has outstanding reviews all over the web. It's made here in Georgia but not sold by the big box stores. It was a joy to install. The instructions were detailed and the design was well thought out. All the pieces fit right and nothing leaked...at least so far.

This morning's field flush successfully cleaned out the bowl with 1.26 gallons and quietly refilled in seconds. I added the easy-close seat/lid, which seems to be the current trend. If you drop the seat or lid from the open position it catches and gently closes. Fun!
Note: I choose not to put a bead of plumber's putty around the underside of the toilet platform as suggested by most toilet installation instructions. I'm following the logic that if the wax seal fails I want to see the leak on my bathroom floor imediatly rather than having it contained within the plumber's putty (or calk as some poeple use) seal under the toilet and forced to go into nasty places.
Sunday, June 15, 2008
Toilet Flange
I cut the PVC pipe for the toilet discharge with a flush saw so I could mount the closet flange onto the tile. It seems most builders say this is the preferred method (some say the top of the flange should be flush with the top of the tile). It's ridiculous there are different opinions on this, such an important part of every bathroom. After destroying several cheap Kobalt brand glass/ceramic tile cutting drill bits from Lowes, I bought one from ACE hardware that actually worked. After about an hour of drilling I finally got six holes through the porcelain tile. I surrounded each hole with plumbers putty and filled it with water to cool the drill bit. Sometimes the water boiled from the heat. That porcelain is tough stuff! I drilled 1/4" holes so the screws would clear them and pull tight against the wood. I used the purple PVC primer and PVC paste to attach my metal ring flange and screwed it securely to the floor. And now I've got a rock solid attachment point for my toilet.
Compression Fittings and Flanges
I added a compression fitting to the roughed in copper toilet supply line. The usual drama occurred when I began cutting through the copper pipe with my hack saw. Even though I turned off the main water line and opened the kitchen sink facet, water sprayed out onto the bathroom floor. I yelled for Melissa to turn on an outside hose and that seemed to do the trick.
Before the compression fitting goes on, you have to put on the flange (the little decorative skirt thing between the tile and the fitting valve). I think they're called escutcheons too. I bought a pretty chrome deep flange made by Keeney & Duracraft Plastics from Lowes. The sealed package said 5/8" OD 1/2" copper pipe but the flange hole was about 1/2". After banging a scrap of copper pipe through the flange with a hammer and using tin snips to force the hole open, I got it to fit. But it looked like crap as a result of the trauma. This was more or less to prove to myself that Keeney had given me the wrong product (or Lowes somehow messed it up).
So I used another white plastic 5/8" OD 1/2" copper pipe flange I had for the sink. It was correctly labeled and fit! The compression fitting went on fine, so I shut its valve off and turned on the main water. I yelled up to Melissa "is it leaking?". She yelled back "Yes!". I yelled back "You've got to be kidding!!!". She yelled back "Maybe it's not leaking, I think it was just a shadow".
Saturday, June 14, 2008
Trim
The base molding was easy. I used the coping saw method for the inside corners and the wood putty method for the outside corners (joke). Of course all the walls were far from square. With 5 inside corners and 2 outside corners, there were lots of cuts. I added shoe molding to the base molding to match the style of the house. This was even easier. The nail gun is a life saver with trim. Okay, and then comes the crown molding....Hate it! This was a real nightmare but we had to do it because the shower tile didn't terminate against the ceiling very gracefully. Crown molding would be the only way to fix this. Each cut felt like a shot in the dark...like I had a 50/50 chance of doing it right. I built a little jig on my miter saw to get the angles right but not only did I have to deal with non-square walls...the ceiling sags in the middle and is way uneven.
Wood putty and caulk. That is so much easier than trying to custom rip each piece of molding to follow the contours of the ceiling and walls.
A few coats of paint later and we've got decent looking molding!
Monday, June 09, 2008
Priming and Painting
Painting sucks. It takes so many steps and can look like crap when done poorly. Fortunatly, Melissa doesn't mind doing it and she does a good job.
First she taped builders paper over all the shower and floor tile. Then she painted on two coats of Zinsser primer on the walls and ceiling. Then she painted the ceiling with ceiling paint and taped around the chair rail shelf and shelves above the vanity. After this, she painted the drywall above the chair rail shelf and the tongue and groove below it.
After examining countless paint chips, we settled on two greenish grayish colors, one slightly darker than the other (for the tongue and groove planks). Unfortunately, once on the walls, the two colors look nearly identical. Oh well.
Finally, Melissa switched the tape around and painted the chair rail shelf, shelves above the vanity, and the door casing molding.
Upon removing the tape, some of the paint came away...yikes. This will be touched up.
She's done for now. But she'll have to tape and paint again after I hang the crown molding, base molding, corner molding, and door (which I had to remove so I could cut the bottom off...it didn't fit with the new tiled floor height).
Sunday, June 01, 2008
Shelves and Durham's Water Putty
This weekend I finish the last of the shelves; a stack of four more. I sanded all the wood and filled all the nail holes with Durham's Water Putty. Durham's was great. It smelled nice, very doughy and was a joy to work with. This week I'll sand down the parts I puttied over and Melissa should be ready to start priming by Saturday.

